What’re the Best Settings for MSI Mini-LED Monitors – HDR & Local Dimming Guide
Monitors
MSI has recently launched a stunning lineup of new Mini-LED Gaming Monitors, including the MPG 274URDFW E16M, MAG 274UPDF E16M, and MAG 274QPF X30MV. These monitors are packed with advanced features designed to deliver a next-level visual experience. To further enhance performance and customization, MSI has also rolled out new firmware that introduces additional adjustment options.
While this wealth of features is fantastic for power users, we've noticed that some community members finds it challenging to navigate and optimize their settings due to the sheer number of choices available.
In this article, we'll cut through the clutter and focus on one of the most impactful features of these Mini-LED displays: Local Dimming—and guide you through the best HDR settings and MSI monitor calibration to reduce blooming.
Quick Settings Summary
MSI’s default HDR settings are designed to deliver the deepest, pure blacks and minimal blooming, providing the best Halo-less effect setting and a visual leap beyond the capabilities of traditional LCD displays.
If you frequently play games or watch content dominated by dark scenes, we recommend referring to the HDR Balance parameters in the table below. This configuration preserves intricate textures in deep shadows while maintaining clarity in high-bright areas. Since the perceived image quality may vary based on your ambient lighting, feel free to fine-tune the settings until the visual experience is suitable for your eyes.
Scenario
Local Dimming
Halo Dimming
Brightness Uniformity
SDR (Office/Web)
Off
N/A
On
HDR (Default Settings)
On (255)
100
Off
HDR (Balance)
On (230)
80 to 90
Off
What is Local Dimming and Why Does it Matter?
For those new to Mini-LED technology, Local Dimming is the key to achieving superior contrast, deeper blacks, and brighter highlights. Instead of lighting the entire screen uniformly, a Mini-LED backlight is divided into hundreds or even thousands of independent Dimming Zones.
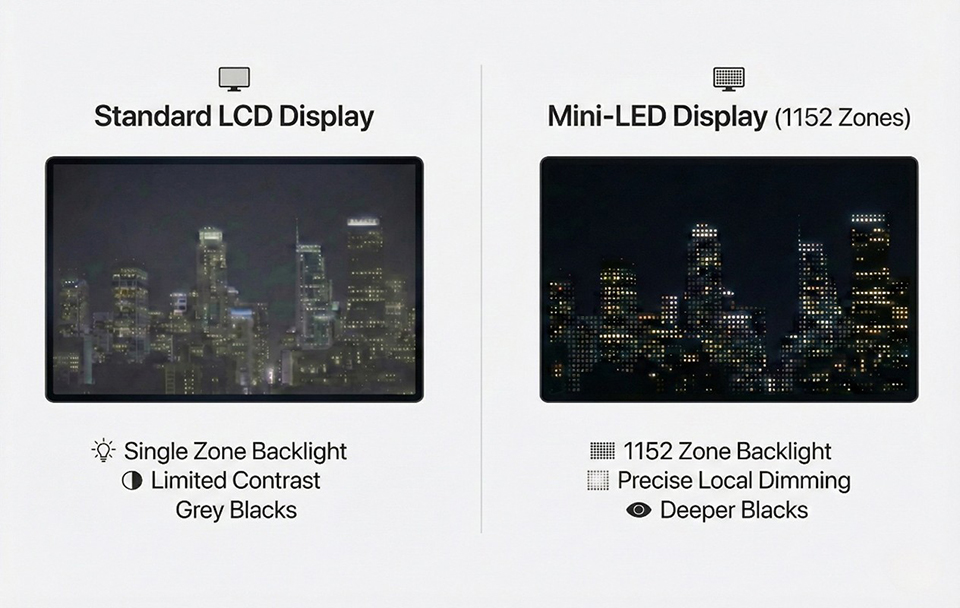
Note: This image is for illustration purposes.
Impact: When a scene is dark, the zones corresponding to those areas can be dimmed or completely turned off, dramatically improving the perceived black level and preventing the washed-out look common on standard LED screens.
The Challenge: Getting the settings right is crucial. Incorrect settings may cause noticeable “Blooming”. (light halos around bright objects on a dark background).
Should You Turn on Local Dimming for SDR Content?
No, we recommend keeping Local Dimming OFF when viewing standard dynamic range (SDR) content. While Local Dimming is a game-changer for high-contrast HDR content, deep contrast is usually not necessary for general SDR scenarios.
When you are using your monitor for tasks such as working on documents, browsing the web, or using standard desktop applications, the comfortable approach is to maintain consistent brightness across the entire panel. Keeping the brightness uniform helps you focus on the work.
Also, we suggest turning on Brightness Uniformity in OSD Menu. Enabling this feature helps prevent the screen edges from appearing dimmed.
What Are the Best Settings When HDR Is Enabled?
Now that we’ve established how to handle SDR content, let's talk about the main event: High Dynamic Range (HDR). When you switch on HDR, you must also activate Local Dimming to unlock the high-contrast experience these Mini-LED monitors were built for. This combination allows you to fully experience the profound contrast between dazzling highlights and pure, deep blacks.
Choosing Your Local Dimming Level in HDR:
Within the OSD Menu, MSI provides three distinct Local Dimming presets, along with a Customization option for those who want ultimate control.
• Level 1, Level 2, Level 3 (Presets)
• Customization
• Customization
If you prefer a "set it and forget it" approach and want the most impactful visual experience instantly, you can confidently select the highest preset: Level 3. This will deliver a profoundly deep black experience, immediately showcasing the power of the Mini-LED backlight.
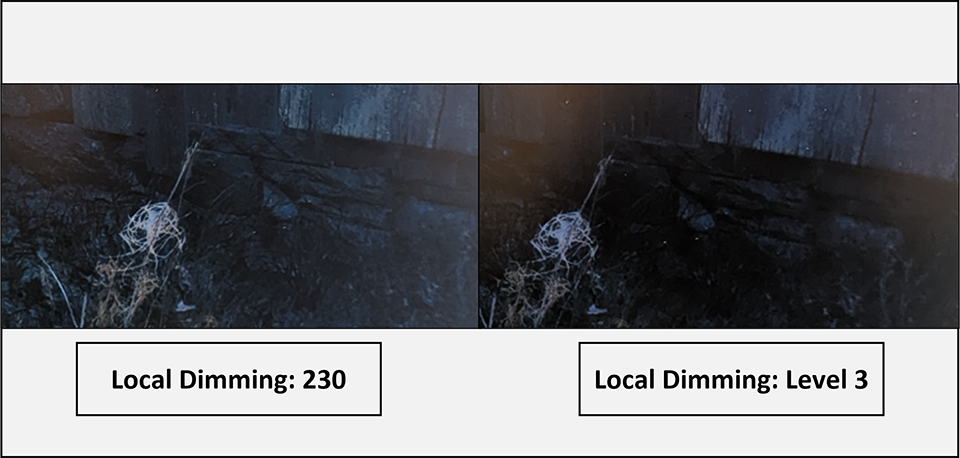
While Level 3 delivers the deepest blacks in very dark scenes (as illustrated in the example image below), this dimming can sometimes obscure fine shadow textures and details.
For the perfectionist: We can adjust the Custom Local Dimming setting to approximately 230. This value strikes an optimal balance between achieving deep blacks and preserving shadow detail. It offers a premium high-contrast image without sacrificing the subtle textures that add depth to dark environments.
How to Set the Halo Dimming Value?
While Mini-LED offers a substantial improvement over traditional backlights by utilizing numerous Local Dimming Zones, they are still fundamentally backlight displays. Unlike self-emissive technologies (such as OLEDs) which generate light per pixel, Mini-LED relies on local dimming zones.
For instance, when a very small, bright object (like a cursor, or a star in a dark sky) appears on a dark background, the backlight zone covering that object must illuminate. Since one zone covers many pixels, the light source often "blooms" slightly into the nearby dark areas. This subtle spreading of light is what we call the Halo Effect or Blooming.
This is where the new Halo Dimming option in your MSI monitor comes into play. This setting is specifically designed to allow users to fine-tune or mitigate the visual manifestation of the halo effect.
As shown in the image below:

Note: It is important to remember that while the magnified image clearly shows the backlight zone fully lit, this does not mean you will see an intensely bright halo with the naked eye under normal viewing conditions. The magnified photo is simply a technical representation of the backlight zone's behavior.
Halo Dimming set to 0: The entire area surrounding the mouse cursor appears fully illuminated by the backlight.
Halo Dimming set to 80: At this level, the backlight is already very well controlled. You can begin to faintly discern the individual pixel structure of the bright object, indicating that the halo effect is significantly mitigated.
Halo Dimming set to the maximum (100): While this provides the strictest control over the halo, providing the deep black. However, the dimming sacrifices some of the desired peak brightness.
To strike the best possible balance—effectively controlling the halo effect while maintaining optimal peak brightness and visual impact—you can set Halo Dimming value between 80 and 90.
To learn more about the MPG 274URDFW E16M, MAG 274UPDF E16M, and MAG 274QPF X30MV:
https://www.msi.com/Monitor/MPG-274URDFW-E16M
https://www.msi.com/Monitor/MAG-274UPDF-E16M
https://www.msi.com/Monitor/MAG-274QPF-X30MV
https://www.msi.com/Monitor/MPG-274URDFW-E16M
https://www.msi.com/Monitor/MAG-274UPDF-E16M
https://www.msi.com/Monitor/MAG-274QPF-X30MV